
How to Make Reverse Halo Channel Letters
Reverse halo channel letters — also called halo-lit or backlit letters — create a glowing outline around each letter rather than illuminating the face. The effect is elegant, upscale, and highly visible at night, which is why they're a staple of hotel lobbies, restaurants, law offices, and luxury retail. They're also one of the more profitable letter styles a sign shop can offer, because customers are willing to pay a premium for the look.
This guide walks through every step: components, bending the returns, LED placement, standoff distance, and how to eliminate the welding step that most shops still rely on.
What Makes Reverse Halo Letters Different
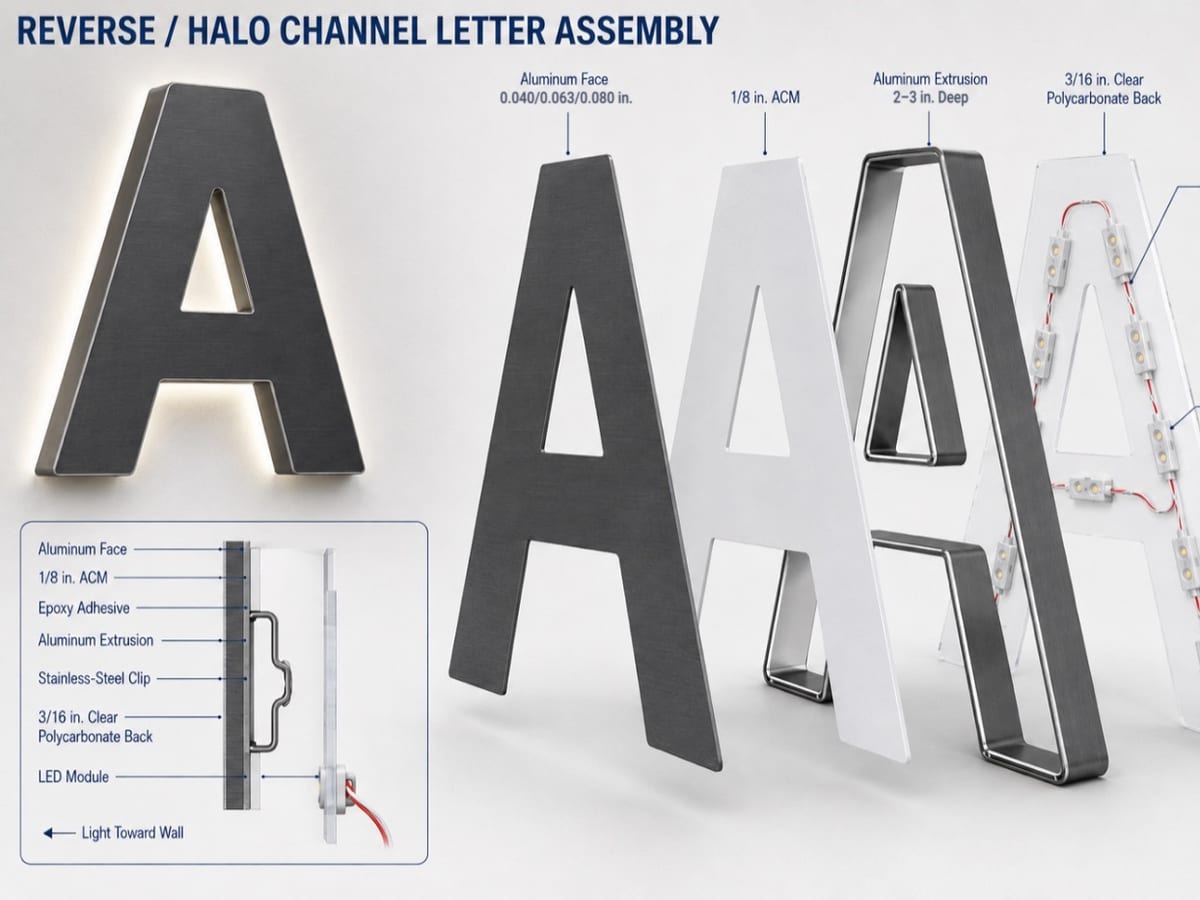
In a standard front-lit channel letter, the open face points toward the viewer and the back attaches to the wall. In a reverse halo letter, the layout is flipped: the face is solid (usually painted aluminum) and sits against the wall side, while the open back faces the viewer. LEDs inside the letter shine outward toward the wall, and the light bounces off the wall surface to create the halo glow around the letter perimeter.
Because the light never reaches the viewer directly, the quality of the wall surface matters. A smooth, light-colored wall produces a clean, even halo. A dark or textured wall absorbs more light and narrows the visible glow — something worth discussing with the client before fabrication begins.
Components You Need
Returns (sides): Bent aluminum coil, typically 0.040" or 0.063" thick. Depth is usually 3" to 5" — deeper returns produce a wider, softer halo; shallower returns concentrate the light closer to the letter edge.
Face: A solid aluminum panel, cut to the letter shape. This is the surface that faces the wall. It is painted or powder-coated to match the client's brand colors. Some fabricators use 0.080" aluminum for the face for added rigidity on large letters.
Back: Polycarbonate or clear acrylic sheet, cut to the letter shape. Using a clear or translucent back lets the installer see the LED layout from the front during setup. Some shops use a painted aluminum back when the open-face look is not desired by the client.
LEDs: Warm white (2700K–3000K) for a traditional luxury halo; cool white (5000K–6500K) for a modern, high-contrast look. LEDs are mounted inside the return, facing outward toward the wall. A standard rule of thumb is one LED module per linear inch of return perimeter, adjusted for letter complexity.
Power supply: Sized to the total wattage of the LED run. Always leave 20–25% headroom — running a driver at 100% capacity shortens its lifespan significantly.
Standoffs: The hardware that holds the letter away from the wall. Standoff distance is the single most important variable controlling the halo effect.
Getting the Standoff Distance Right
The standoff distance — the gap between the back of the letter and the wall — determines how wide and how soft the halo appears.
- 1" – 1.5": Tight, defined halo. Works well in small-letter applications and on dark walls where you want the glow concentrated close to the letter edge.
- 2" – 3": The standard range for most commercial installations. Produces a clean, even halo that reads well from across a room or street.
- 4" and beyond: Wide, diffused halo. Dramatic effect for large exterior letters on light-colored walls. Requires deeper returns to contain the light source.
A practical rule: standoff distance should equal roughly half the letter depth. A 4" deep letter looks best at a 2" standoff. Deviating significantly from this ratio either cuts off the glow or lets light spill too far.
Bending the Returns
Reverse halo returns are bent exactly like standard channel letter returns — the bending machine doesn't distinguish between letter types. What changes is the depth spec and the decision about whether to weld.
The traditional welding approach
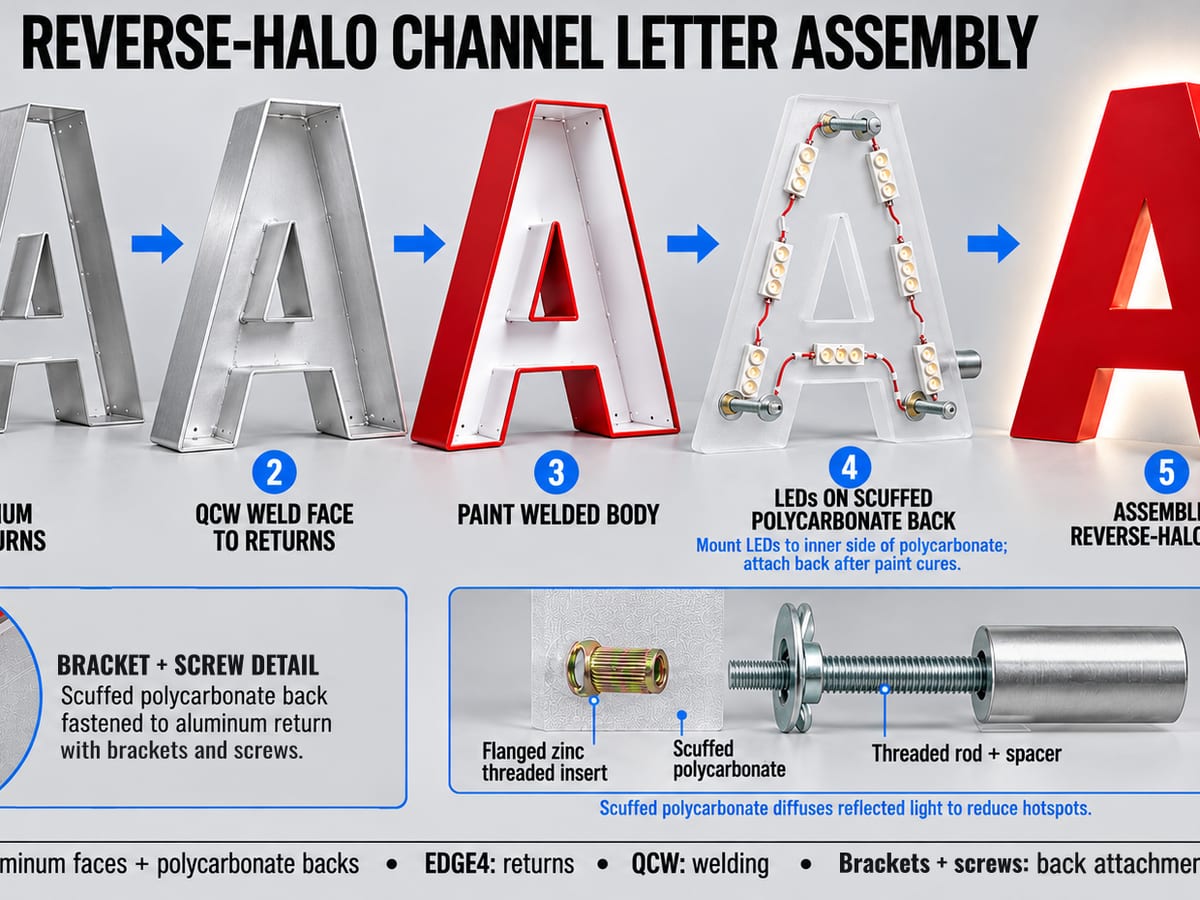
Most shops producing reverse halo letters cut notches into the aluminum coil, bend the return on a bending machine, then TIG weld the back panel to the return. Welding gives a clean seam and a rigid assembly, but it adds a skilled-labor step, slows throughput, and introduces heat that can warp thinner material.
The no-weld approach with Ascent extrusions and clips for the back
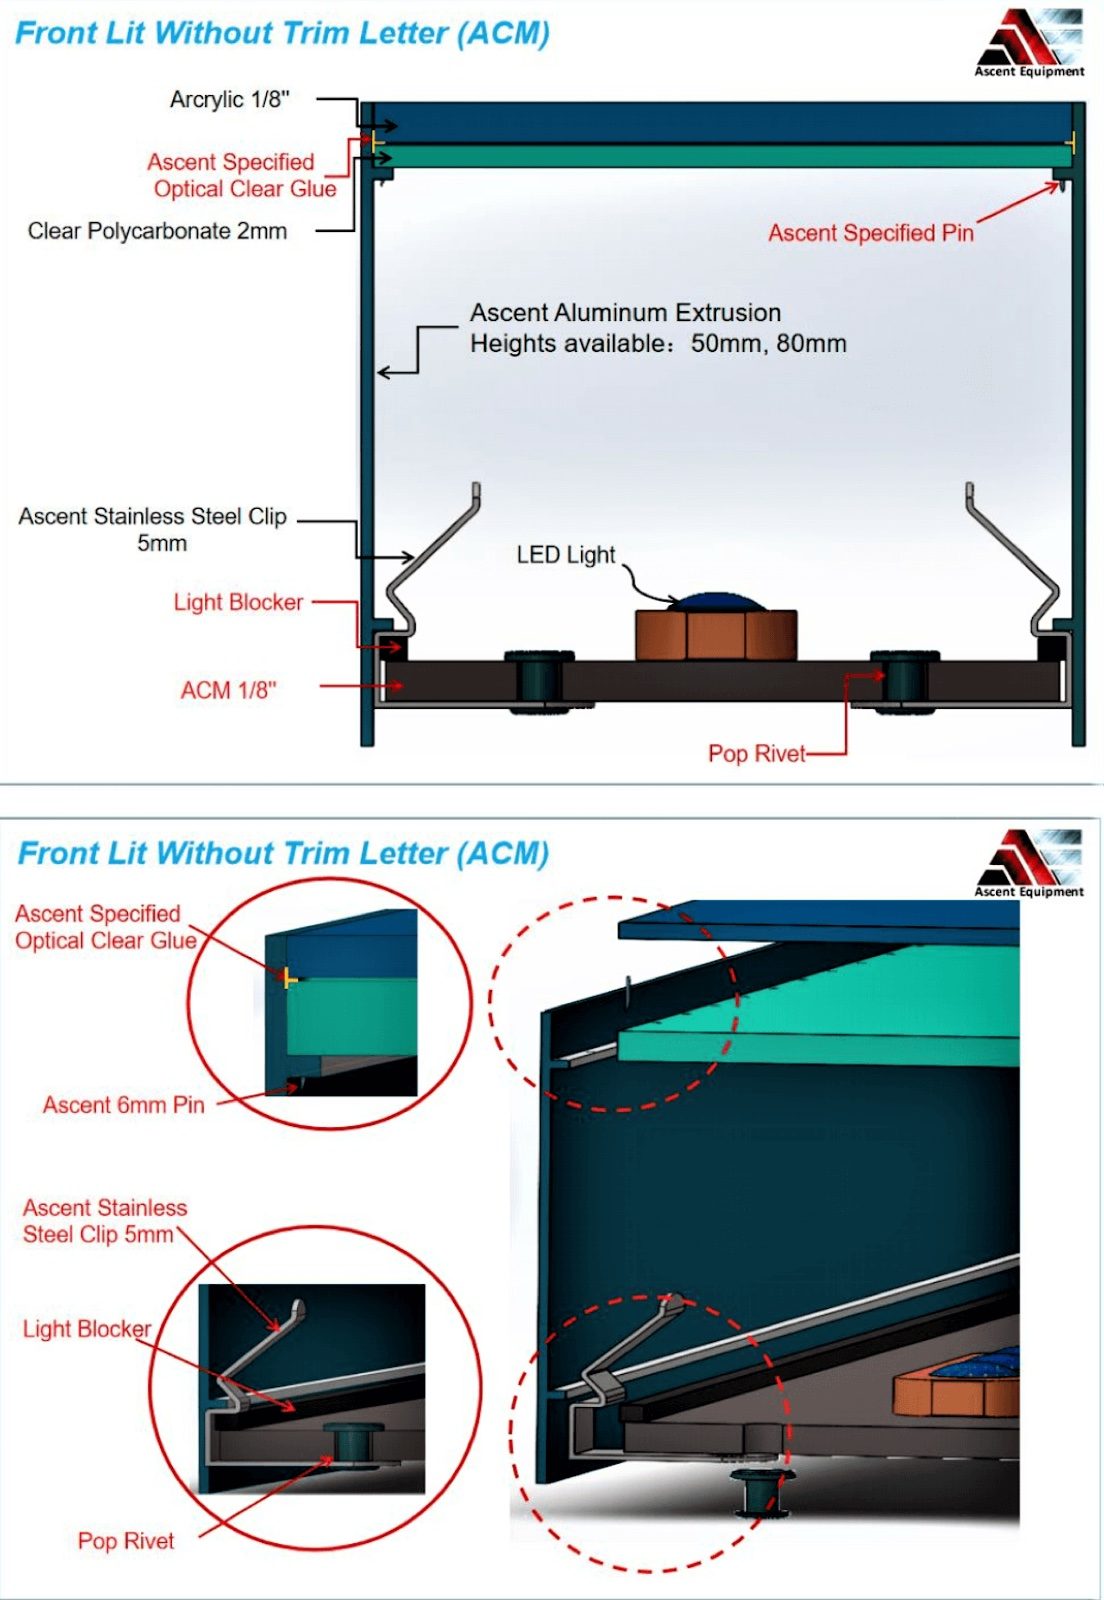
The Ascent 4AS and 5AS bending machines produce reverse halo letters without welding. The return is formed using Ascent aluminum extrusion profiles, and the back panel is secured with stainless steel clips — no heat, no TIG torch, no warping risk. The extrusions provide the structural rigidity; the clips lock the back cleanly and repeatably. The result is a rigid, professional letter in significantly less time — a single operator can close a reverse halo letter in a fraction of the time it takes to weld.
This matters most at volume. A shop running 300 or more letters per month will find that eliminating the welding step on reverse halo production has a larger impact on throughput than almost any other process change.
LED Placement Inside the Return
Mount the LED strip on the interior face of the return, running along the perimeter. Aim the LEDs perpendicular to the wall (pointing straight out through the open back) rather than angling them toward the face or the back panel.
Keep the LED strip at least 0.5" from the back edge of the return so the light doesn't create a hot spot directly against the wall. If you're using a 4" or deeper return, a second parallel run of LEDs along the inner perimeter can fill in any dim areas, particularly on wide strokes.
Avoid gaps at corners and tight curves — this is where halo unevenness shows up most clearly when the sign is lit. Flexible LED strips handle curves easily; just cut and reconnect at sharp internal corners rather than forcing the strip around a bend that exceeds its rated minimum radius.
Assembly Order
- Bend returns on the bending machine to the letter path.
- Cut the face panel (solid aluminum) to the letter outline.
- Cut the back panel (polycarbonate or aluminum) to the letter outline.
- Attach the face to the front edge of the return using your preferred method (clips, adhesive, or mechanical fasteners).
- Install the LED strip along the interior perimeter of the return.
- Wire to the power supply and test before closing.
- Attach the back panel to the return using stainless steel clips or weld seam.
- Drill and tap standoff mounting points in the back panel.
Testing before closing the back is non-negotiable. It is far faster to fix a wiring issue on the bench than after the letter is sealed.
Common Problems and How to Avoid Them
Uneven halo: Usually caused by inconsistent LED density around the perimeter, or standoffs mounted at slightly different depths. Check standoff lengths before installation and use a level on every letter.
Hot spots near the letter edge: LEDs mounted too close to the back panel. Move the strip inward at least 0.5", or switch to a lower-intensity module in that area.
Halo barely visible in daylight: This is normal — reverse halo is an ambient-light effect and looks best at dusk and night. If the client expects daytime impact, pair the reverse halo with a brushed or painted aluminum face that reads well in daylight regardless of lighting.
Return warping: Usually from welding with too much heat on 0.040" material. Switching to the Ascent extrusions method with clips for the back eliminates this issue entirely.
When to Recommend Reverse Halo to Clients
Reverse halo letters are the right choice when the client values a premium, understated look over maximum daytime brightness. They work best on:
- Light-colored, smooth wall surfaces (painted drywall, metal panel, smooth concrete)
- Indoor lobby and reception applications
- Exterior applications where the building facade is pale or white
- Hospitality, legal, financial, and luxury retail brands
They are not the best fit for high-ambient-light outdoor environments where the sign needs to compete with direct sunlight, or for walls with heavy texture that scatters the halo glow.
The Equipment That Makes It Efficient
Producing reverse halo letters profitably at scale requires a bending machine that can handle the depth and the no-weld assembly method. The Ascent 4AS is the entry point — it handles 0.040" and 0.063" aluminum up to 8" depth and produces reverse halo letters without welding using the Ascent clip system. The 5AS adds F-trim capability and handles stainless steel, making it the better choice for shops that produce a wide variety of letter types in the same run.
Both machines include on-site installation and training, so your operators are producing reverse halo letters from day one. If you're adding this letter type to your shop's offering for the first time, contact us and we can walk through the right setup for your production volume.